sudo usermod -a -G libvirt $(whoami)
minkube installation
curl -LO https://storage.googleapis.com/minikube/releases/latest/minikube-latest.x86_64.rpm

sudo rpm -Uvh minikube-latest.x86_64.rpmXMLRPC
# Block WordPress xmlrpc.php requests
<Files xmlrpc.php>
order deny,allow
deny from all
</Files>MDADM: Software RAID
Re-add disk to array:
mdadm --manage /dev/mdx --add /dev/sdx1
Assemble Array
sudo mdadm --assemble --scan

Stop Array
sudo mdadm -S /dev/mdx

Create Array
sudo mdadm --create --verbose /dev/mdx --level=0-6 --raid-devices=3 /dev/sdb1 /dev/sdc1 /dev/sdd1 /dev/sde1
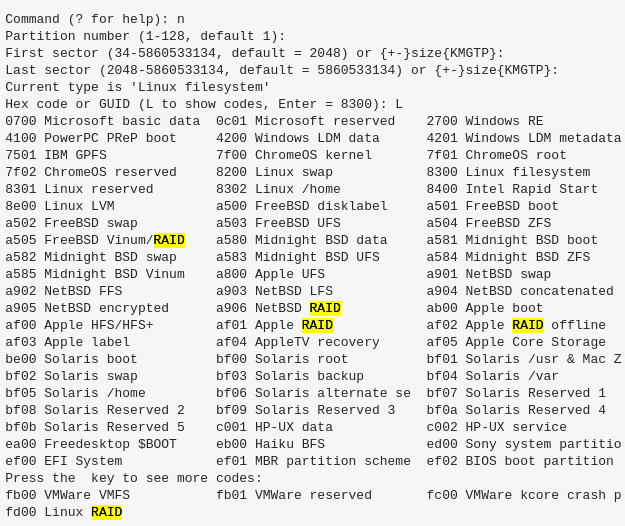
Linux RAID Filesystem
gdisk partition type:
Hex Code: 42 ‘Linux Raid’

Mount Windows Share in Linux
sudo mount -t cifs -o username=<win_share_user> //WIN_SHARE_IP/<share_name> /mnt/win_share

Requirements: sudo yum -y install cifs-utilsLetsEncrypt + Certbot + Subdomain
sudo certbot certonly –apache -d x.example.com
Certbot
Certbot always puts the latest version of all certificates under /etc/letsencrypt/live:
/etc/letsencrypt/live
├── mail.example.org
│   ├── cert.pem -> ../../archive/mail.example.org/cert8.pem
│   ├── chain.pem -> ../../archive/mail.example.org/chain8.pem
│   ├── fullchain.pem -> ../../archive/mail.example.org/fullchain8.pem
│   └── privkey.pem -> ../../archive/mail.example.org/privkey8.pem
└── www.example.org
    ├── cert.pem -> ../../archive/www.example.org/cert7.pem
    ├── chain.pem -> ../../archive/www.example.org/chain7.pem
    ├── fullchain.pem -> ../../archive/www.example.org/fullchain7.pem
    └── privkey.pem -> ../../archive/www.example.org/privkey7.pem
Therefore you would configure services like this:
SSLCertificateFile     /etc/letsencrypt/live/www.example.org/fullchain.pem
SSLCertificateKeyFile  /etc/letsencrypt/live/www.example.org/privkey.pem
This way, services only need to be reloaded, not reconfigured, after every renew. Use certbot’s “deploy hook” feature to automate permission changes, service reloads, and anything else that needs automating.
Flush Linux DNS Cache
$ sudo systemd-resolve --flush-caches

$ sudo resolvectl flush-cachesDefault Files/Folders *Nix Permissions
There is no magic procedure, the only way to restore it would be manually.
Fortunatelly the procedure is easy, but it should have to be performed carefully
Step 1: Copy the following script, paste it on your console to generate fixpermission script
echo ‘ chmod -R 755 /bin /boot /dev /etc/ /home /lib /lib64 \ /media /mnt /opt /run /sbin /srv /usr /var
chmod -R 777 /initrd.img /vmlinuz chmod -R 1777 /tmp chmod -R 555 /sys chmod -R 555 /proc chmod -R 700 /root
‘ > fixpermission
chmod +x fixpermission
./fixpermission
The above will create a script named fixpermission and run it by ./fixpermission if not already invoked.
Step 2: Run stat -c ‘%A %a %n’ /* to show your proper directory and their permission as restored.
Example: Your directory permission structure should look similar to the following:
drwxr-xr-x 755 /bin
drwxr-xr-x 755 /boot
drwxr-xr-x 755 /dev
drwxr-xr-x 755 /etc
drwxr-xr-x 755 /home
lrwxrwxrwx 777 /initrd.img
lrwxrwxrwx 777 /initrd.img.old
drwxr-xr-x 755 /lib
drwxr-xr-x 755 /lib64
drwx------ 700 /lost+found
drwxr-xr-x 755 /media
drwxr-xr-x 755 /mnt
drwxr-xr-x 755 /opt
dr-xr-xr-x 555 /proc
drwx------ 700 /root
drwxr-xr-x 755 /run
drwxr-xr-x 755 /sbin
drwxr-xr-x 755 /srv
dr-xr-xr-x 555 /sys
drwxrwxrwt 1777 /tmp
drwxr-xr-x 755 /usr
drwxr-xr-x 755 /var
lrwxrwxrwx 777 /vmlinuz
lrwxrwxrwx 777 /vmlinuz.old